
Manual
This is the VideoProcessor manual; it can be read as-is to get an in-depth understanding of VideoProcessor.
Alternatively, you'll find  icons in the GUI, clicking these
will take you to the topics here.
icons in the GUI, clicking these
will take you to the topics here.
Capture input.
The graphics pipeline of VideoProcessor starts with getting frames (both audio and video) from the wire, which generally will be HDMI. Schematically the relevant components look like the following:
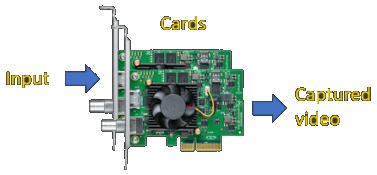
Data comes in on an interface on a capture card. After capture, the card will forward it to the application. This pipeline is reflected in the GUI in a vertical manner with the card and it's input at the top and from there on working down towards the captured video in the application. The following is an example input:
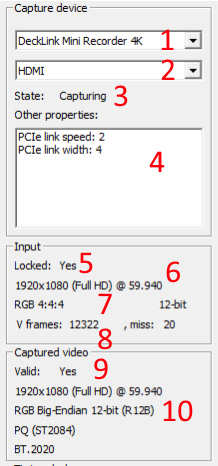
- The selected capture card. If you have multiple capture cards there will be multiple entries here. It will default to the first available card.
- The selected input port on your capture card. Most cards have more than one port. This will default to a port called HDMI.
- The state of the capture, if this is "capturing" your card is reading from the HDMI wire. This does not mean that it's also getting valid input.
- Additional capture card data. DeckLink users will want to see PCIe speed 2 and width >=4 here.
- If there is an input signal on the HDMI cable the card can recognize, locked will be Yes and the other fields will be populated.
- This is the input resolution and frame rate
- The input encoding and bit depth
- Number of seen frames. V=Video, A=Audio. Miss are gaps in the stream were we would expect a frame but where none came.
- If VideoProcessor understands the format being output from your card valid will be Yes and the other fields will be populated.
- Your video card's output does not need to be the same as it's input. The cards' firmware can encode it any way it wants/needs. This field will reflect how the data is represented in the software.
Timing clock.
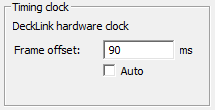
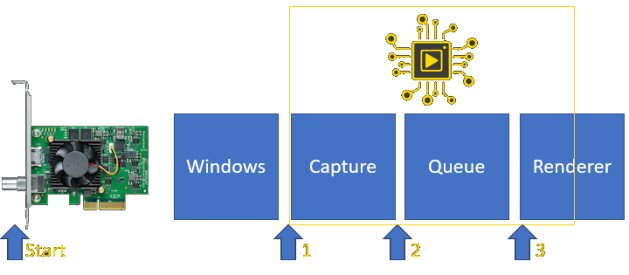
This displays which clock is used to timestamp the incoming frames. This will always use the best available clock, which is the capture card hardware clock. In order to understand how to set the frame offset you must understand the flow of time through VideoProcessor first. The following image represents the timing domain, all components here are driven by the same clock coming from the capture card hardware.
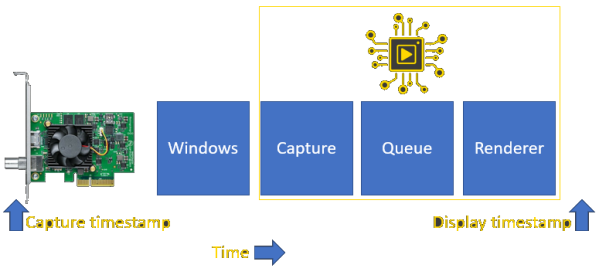
The frame timestamp should ideally be just behind the VideoProcessor renderer. This gives the final renderer (DirectShow) some time to wait before it needs to accept the frame. The timestamp however is taken at the point where the frame entered the capture card; you can say that the capture timestamp is always "behind" from the clock as it was taken in the hardware before the process saw it.
You can correct this forward to the point where it should be rendered with the Frame Offset option. 90ms is about the time it takes to process everything on a modern computer so that's the default. Enabling Auto will monitor the latency in the system and will adjust accordingly if it's out of line (with a restart of the renderer which might be annoying).
HDR.
If the input is a High Dynamic Range (HDR) video signal the center column will display it's properties.
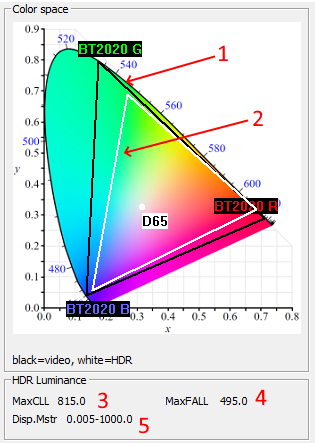
This is a CIE 1931 colorspace diagram; the colored area represents what is visible to the human eye. Within it are two triangles, which most of the time overlap so you only see one. Well known coordinates in the color space are translated to human-readable names. D65 for example means the ~6500K white point.
- The black triangle represents the video container. This should always be >= the white triangle.
- The white triangle represents the HDR metata, it is most often equal but can also be less than the video container.
These values relay information about the brightness of the frame and how it was seen during the mastering process. More details here and here.
- Maximum Content Light Level (MaxCLL) represents the pixel light level in nits in whole movie.
- Maximum Frame Average Light Level (MaxFALL) represents the maximum average light level of a frame in nits.
- Min and max light levels of the display user for mastering the movie.
Latency.
It takes time for video frames to move through the system and into the final renderer, this is called latency. There are 3 points in the system where this time is sampled.
This is represented in the GUI in the latency group:
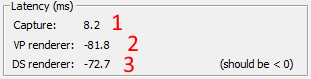
- The time it took from the hardware capture to arrival in the videoprocessor process. This is 8-9ms on a modern PC if all is well.
- The time it took from the hardware capture to arrival at the first part of the renderer, the queue. Minus the frame offset. This should be very close to (1) plus the offset, which if you leave the offset at 90, would be around -82 to -81ms.
- The time it took from the hardware capture to handoff to the rendere. Minus the frame offset. This should be below zero for less than a frame duration for best results, as that means it's to be rendered slighty in the future. This little bit of time is all that the renderer needs to ensure that the frame is played at exactly the right point in time.
Renderer.
The renderer is the component which takes the video stream from the capture card and turns it into visible pixels. VideoProcessor is designed to support multiple renderers from different technologies, but right now it only supports DirectShow renderers.
Renderer selection and lifetime
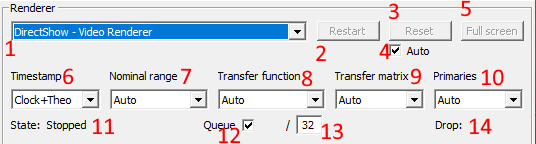
- This is the renderer to use. This list is auto-populated from the OS on a name basis, it is possible that VideoProcessor will show non-functional renderers.
- Restart forces a total restart of the renderer, removing it entirely and starting it up again. Generally this is not needed.
- Reset stops, clears and starts the renderer. This can help in removing queues in DirectShow renderers. This is very fast.
- Auto reset will reset automatically once in a while if the queue is too large. Given that this generally only is a startup problem there will be no more resets after the beginning.
- The party button.
-
Determines how frames are timestamped. DirectShow needs a start and a stop time and this menu gives you full flexibility on how that's used.
- Clock-smart: Combines clock-theo and clock-clock. Will take clock-clock if there is a queue, else will use clock-theo.
- Clock-theo: Will just add the theoretical time to the start timestamp which comes from the clock. This does not need to perfectly align with the timestamps (resolution difference and real-world clock wobble) and hence there will be a little bit of non-frame time.
- Clock-clock: Will force a minimial queue of 2 and it'll take the start timestamp of the next frame as the stop timestamp of the current. This is the most pure way to do it as there is no non-frame time in the timestream and all frames line up perfectly. In practice it leads to visual hickups.
- Theo-theo: Just generates timestamps at a rate of the refresh rate
- Clock-None: Will take the clock timestamp for start, does not set a stop-time
- Theo-None: Just generates timestamps at a rate of the refresh rate, does not set a stop-time
- None: No timestamps, this will force the renderer to render immediately as this is an indicate it's too late.
VideoProcessor cannot always perfectly determine what the HDR metadata is. Or when you have a source which sends the right pixels but the wrong metadata. For these cases you can use the overrides here.
- Nominal range override.
- Transfer function override.
- Transfer matrix override.
- Primaries override.
- The state of the renderer. Only when this is Running will there be a picture.
- If checked VideoProcessor will use a queue and a separate renderer thread to buffer frames between capture and renderer. If unchecked the capture will call the renderer directly, this will lead to major delays in DirectShow.
- This is the current queue size and the maximum queue size. If the queue gets bigger than the maximum the oldest frame is dropped. You want your queue to always be around 0-2. Anything more means you should press reset.
- Drop count for frames which were not shown.
Keyboard shortcuts.
The following shortcuts are hardcoded into VideoProcessor. Any other key combination or press is forwarded to the renderer.
- ALT+F4: Exit process
- ALT+Enter: Toggle full screen
- ESC: Exit full screen
- r: Reset the renderer.
- Enter: Context dependent if you're in an input box it'll do what is needed. Default is to restart the renderer.
Command line arguments.
The following command line arguments are supported:
- /fullscreen: Go immediately to fullscreen after starting.
- /renderer [name]: Name of the renderer to start, for example "DirectShow - Video Renderer" (case-insensitive)
- /frame_offset [value]: The frame offset in ms to use as a number, using "auto" will enable auto tuning.
- Windows redirection works, adding "2>&1 >log.txt" will lead to a logfile, though VP logs extremely litte in release mode.